Maropost Commerce Cloud (Neto) Setup Guide
Maropost Commerce Cloud Integration in touchSMS
Connect touchSMS MCC Integration
Once you’ve registered and verified your touchSMS account, you will need to connect your Maropost Commerce Cloud Integration. Start by logging in to your touchSMS account:
1. Navigate to Integrations > Maropost Commerce Cloud > Click Configure
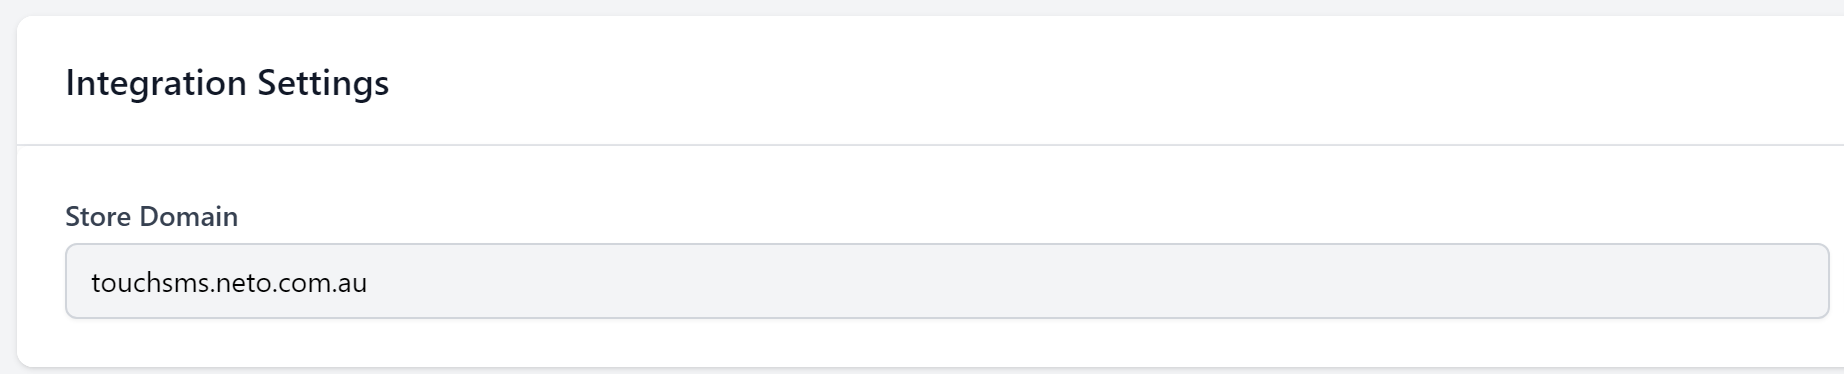
2. Enter your online store domain. Click Connect.
3. Maropost Commerce Cloud login screen will pop up in a new window. Enter your Store Account Login details. Click Log in to connect your Online store and touchSMS account.

4. Once you have successfully connected, your Maropost Commerce Cloud configuration settings will now appear in touchSMS.
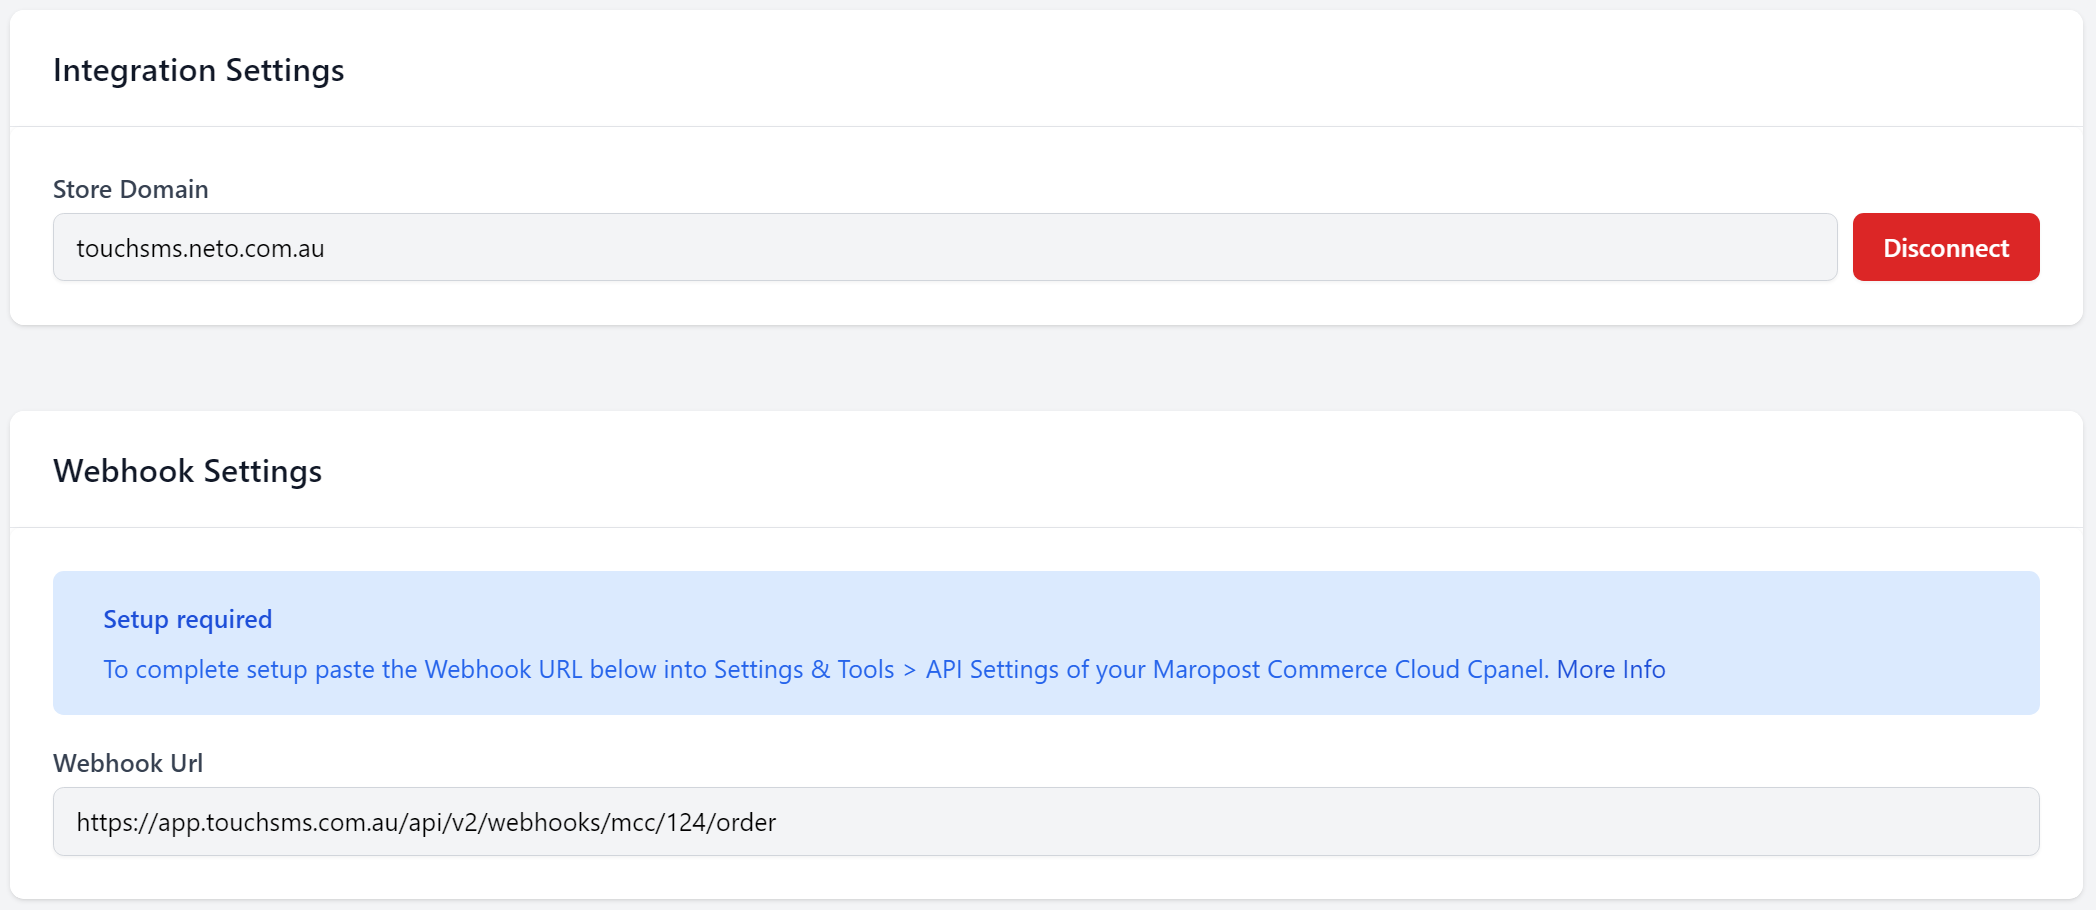
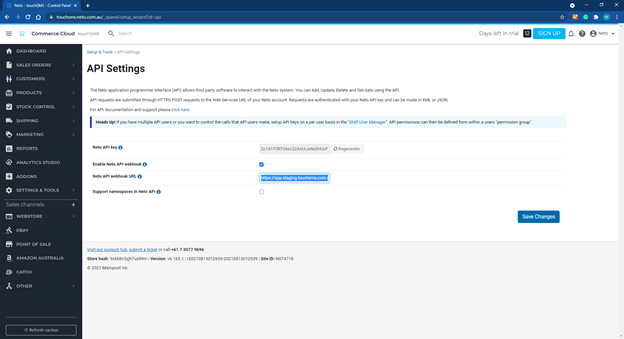
5. To complete the setup, paste your Webhook URL (found below Webhook Settings) into the API Settings of your Maropost Commerce Cloud store Cpanel.
To do this:
Login to your MCC store and navigate to Settings & Tools > All Settings & Tools
Click on Developer Tools in the menu > API Settings
Paste the touchSMS webhook URL into Neto API webhook URL field
Ensure Enable Neto API webhook is checked
Click Save Changes
Done! Your touchSMS integration for Maropost Commerce Cloud is ready to configure
Configure SMS Notifications for MCC
Log into your touchSMS account:
1. Navigate to Integrations > Maropost Commerce Cloud > Click Configure
2. Under General Settings, enable the features you want to use.
3. Click Save to apply changes when you’re done.
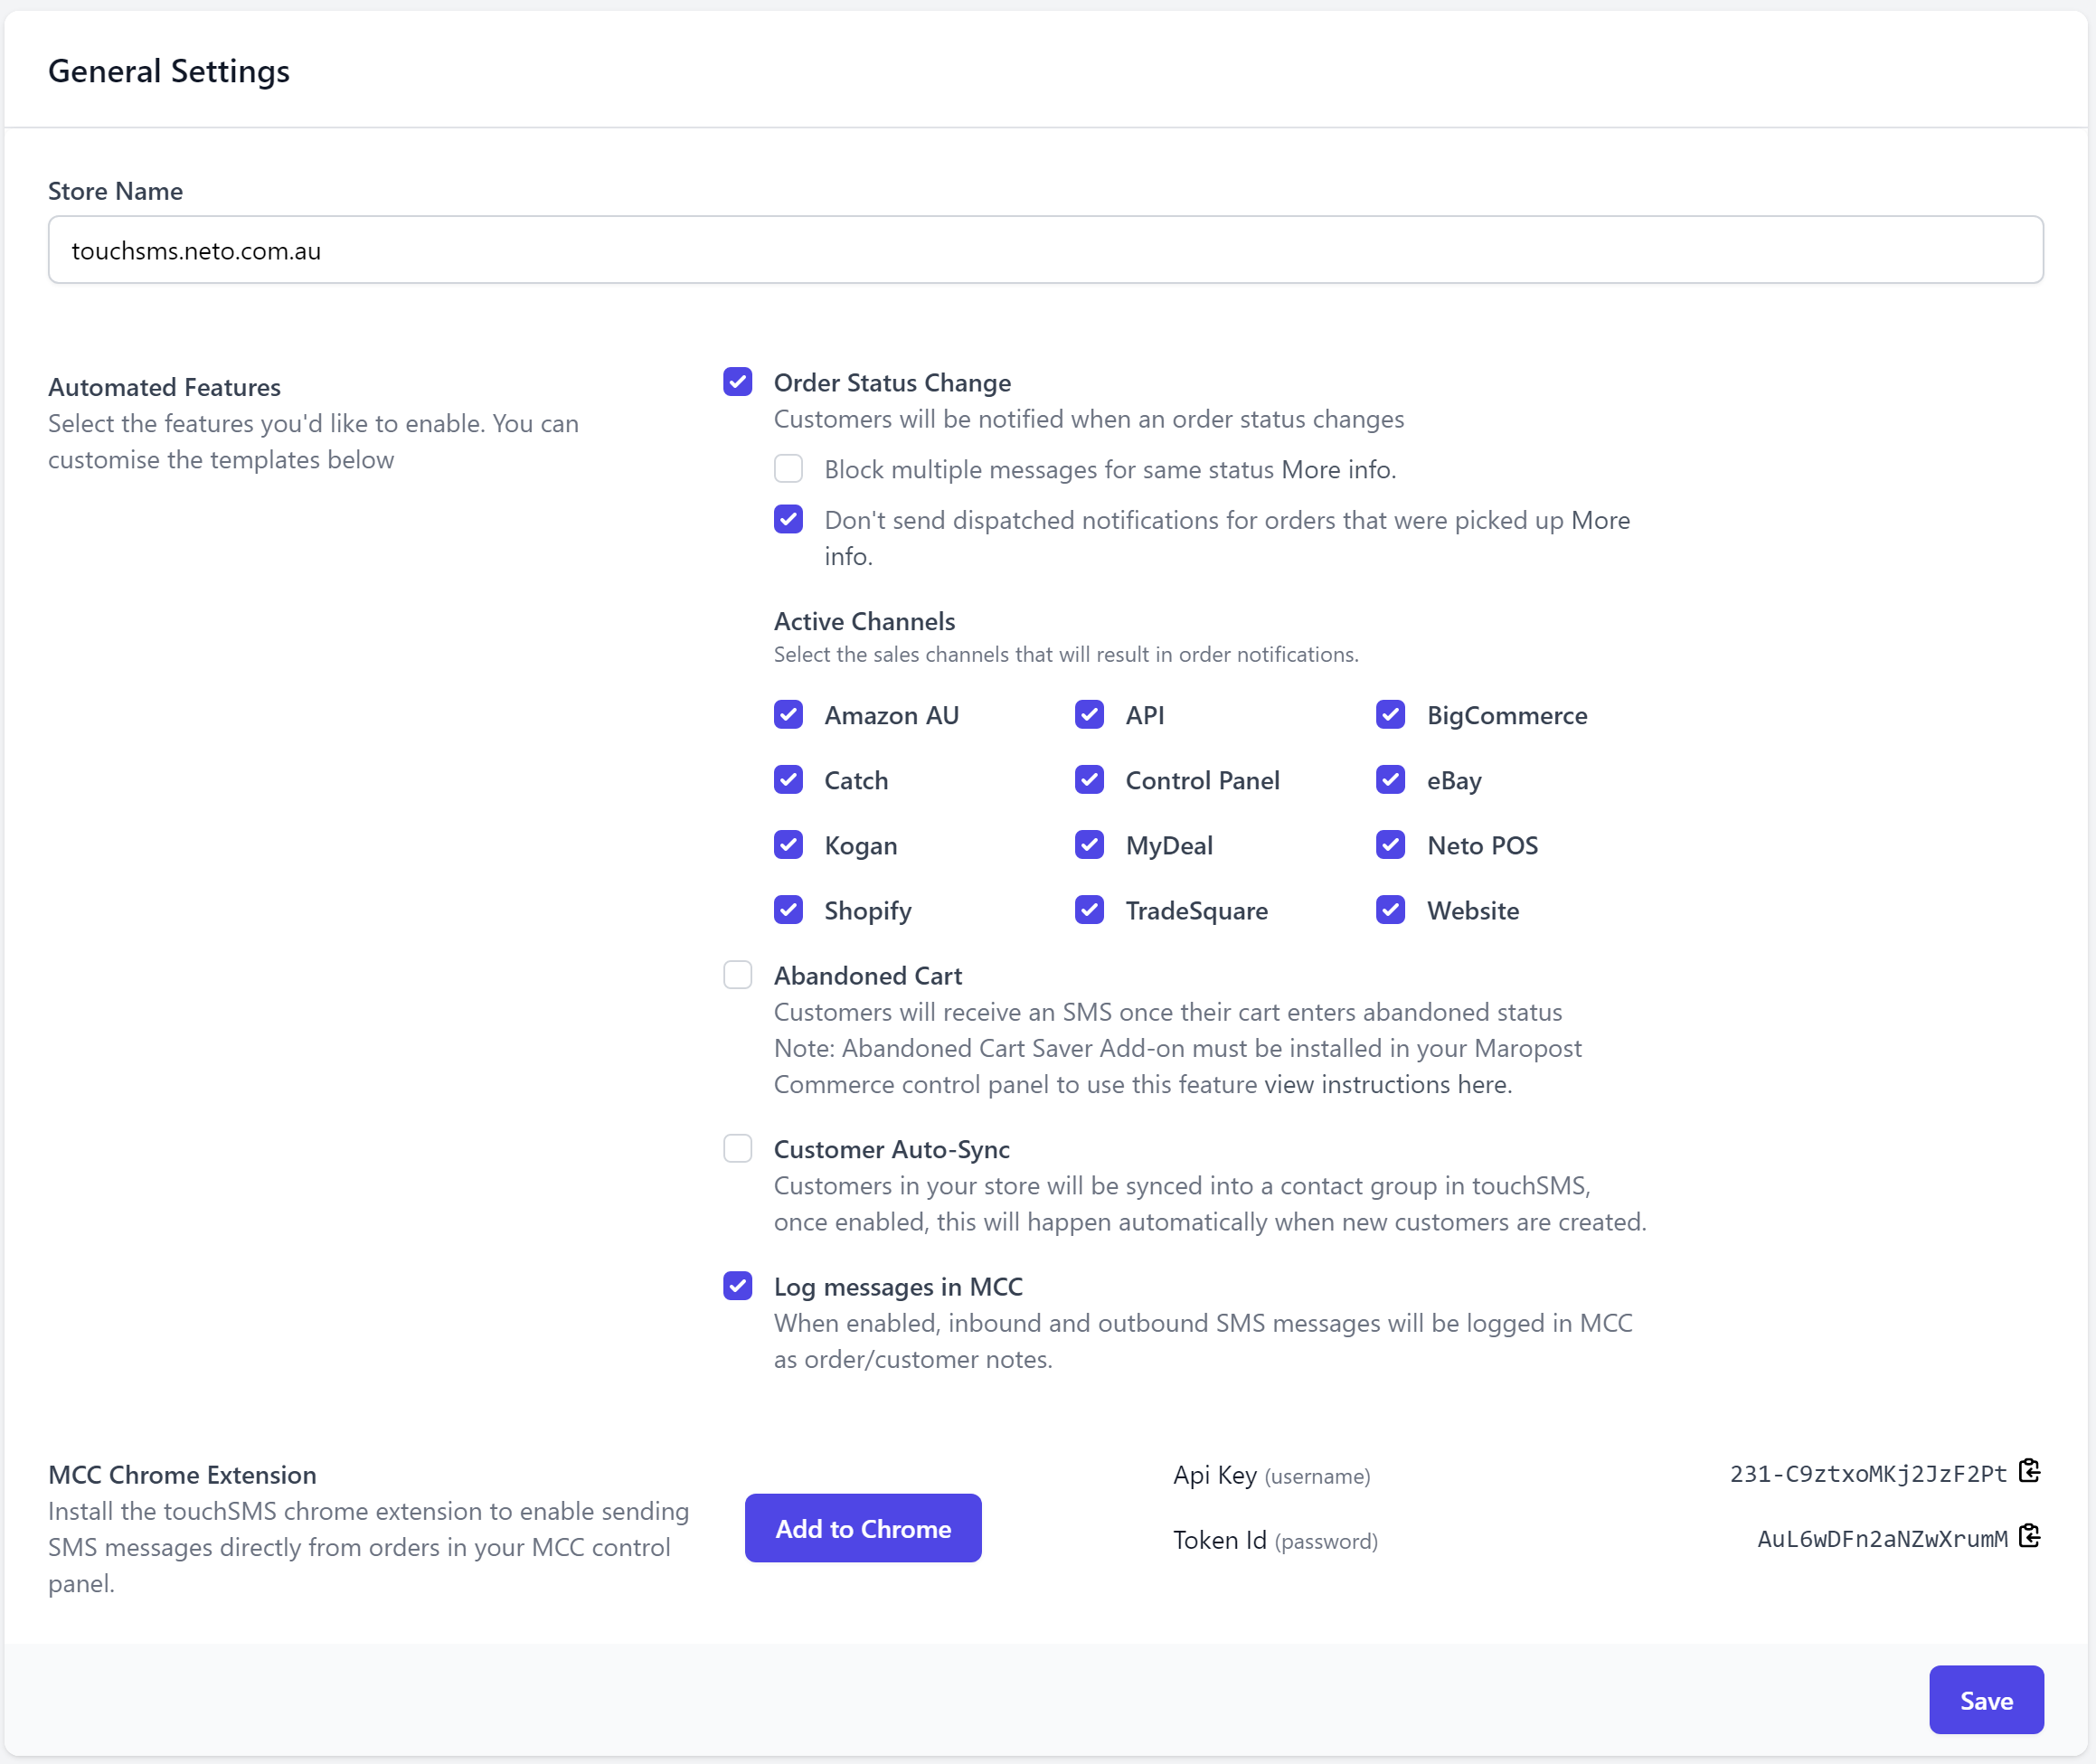
Store Name
The store name entered here is used as a sign off in the SMS notifications you send. By default, this will appear as your store web address, but can be changed any time.
Automated Features
Use the checkboxes to enable the following touchSMS features for Maropost:
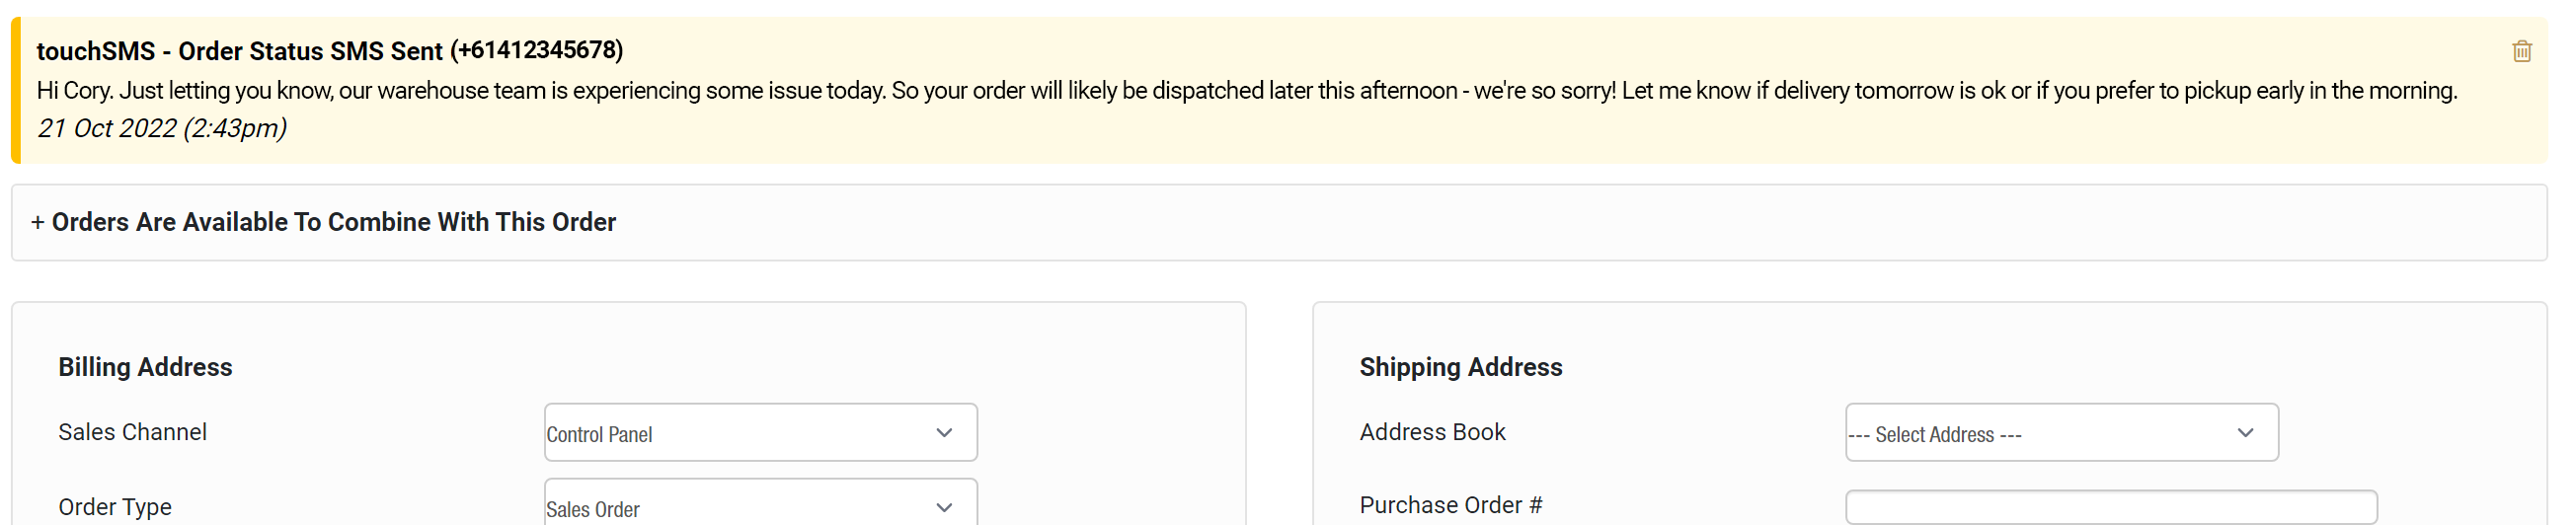
Order Status Changes
Automatically send personalised order status notifications to customers by SMS. Choose which order status triggers an SMS notification and customise the content of each message template.
TIPS: If your sales process includes orders being placed back to previous statuses, ie. from NEW to ON HOLD then back to NEW, check the box to “Block multiple messages for the same status“. This will prevent the order status message for NEW orders, from being sent twice.
Prevent Dispatched order status messages from submission to those customers whose orders are not shipped, by checking the box “Don’t send Dispatch notifications for orders that were picked up”
Active Channels
Use the checkboxes to choose which of your sales channels are enabled for automatic SMS notifications.
NOTE: Specific filters can be enabled for wholesale and retail customers. Contact our support team at support@touchsms.com.au for details.
Abandoned Cart
Before enabling this feature, ensure Abandoned Cart Saver is installed in your Maropost Commerce control panel – view instructions here.
Customers who have added items to their cart but have not completed their purchase will receive the message you specify in your Abandoned Cart template. Customise your message with offers or discounts that encourage them to return and complete their purchase.
Sync Customers
When selected, all Maropost customers will be imported to your touchSMS account as contacts. This means you can send marketing, promotional or reminder messages to your entire customer base or just a few, in seconds.
Log Messages in MCC
Enable this to have messages sent and received, logged in order and customer notes as sticky notes.
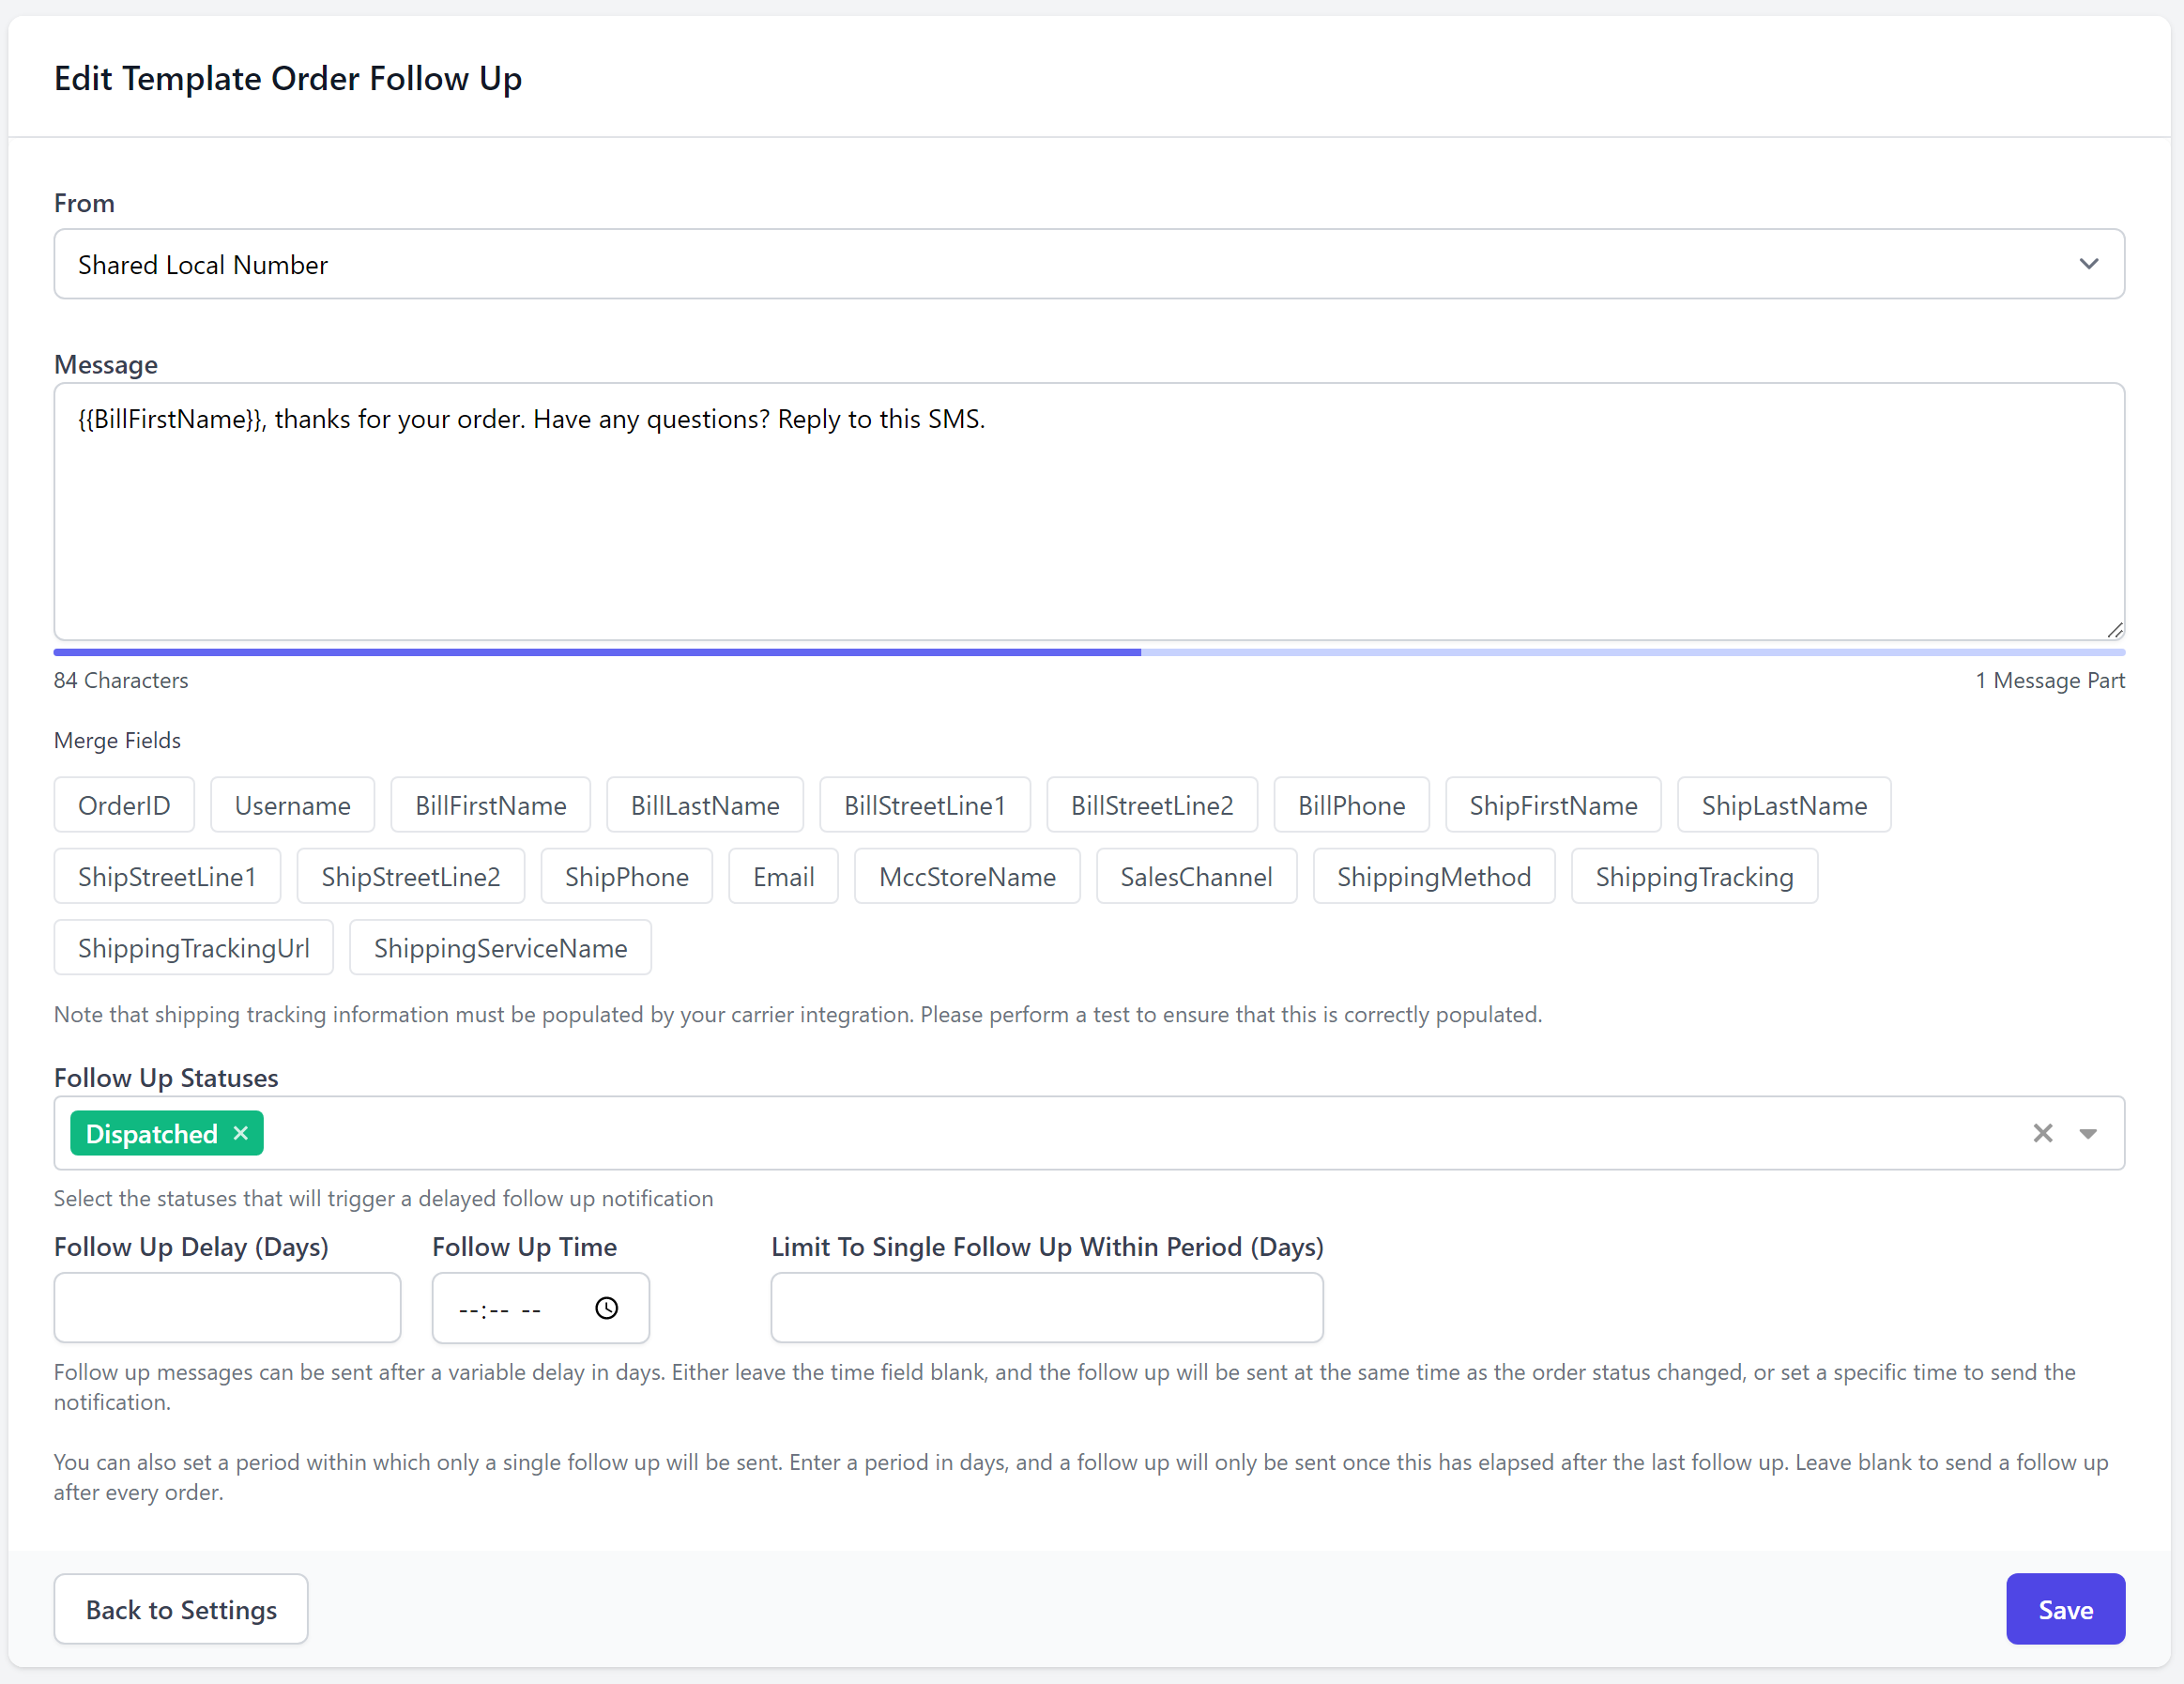
Enabling and Editing Order Status Notifications
If you have enabled Order Status Changes, you must also select which order status you would like to trigger an SMS and what the message contains.
You will find a template for each Order Status and Follow Up under TEMPLATES. Use the toggle to ENABLE those you want to trigger an SMS.
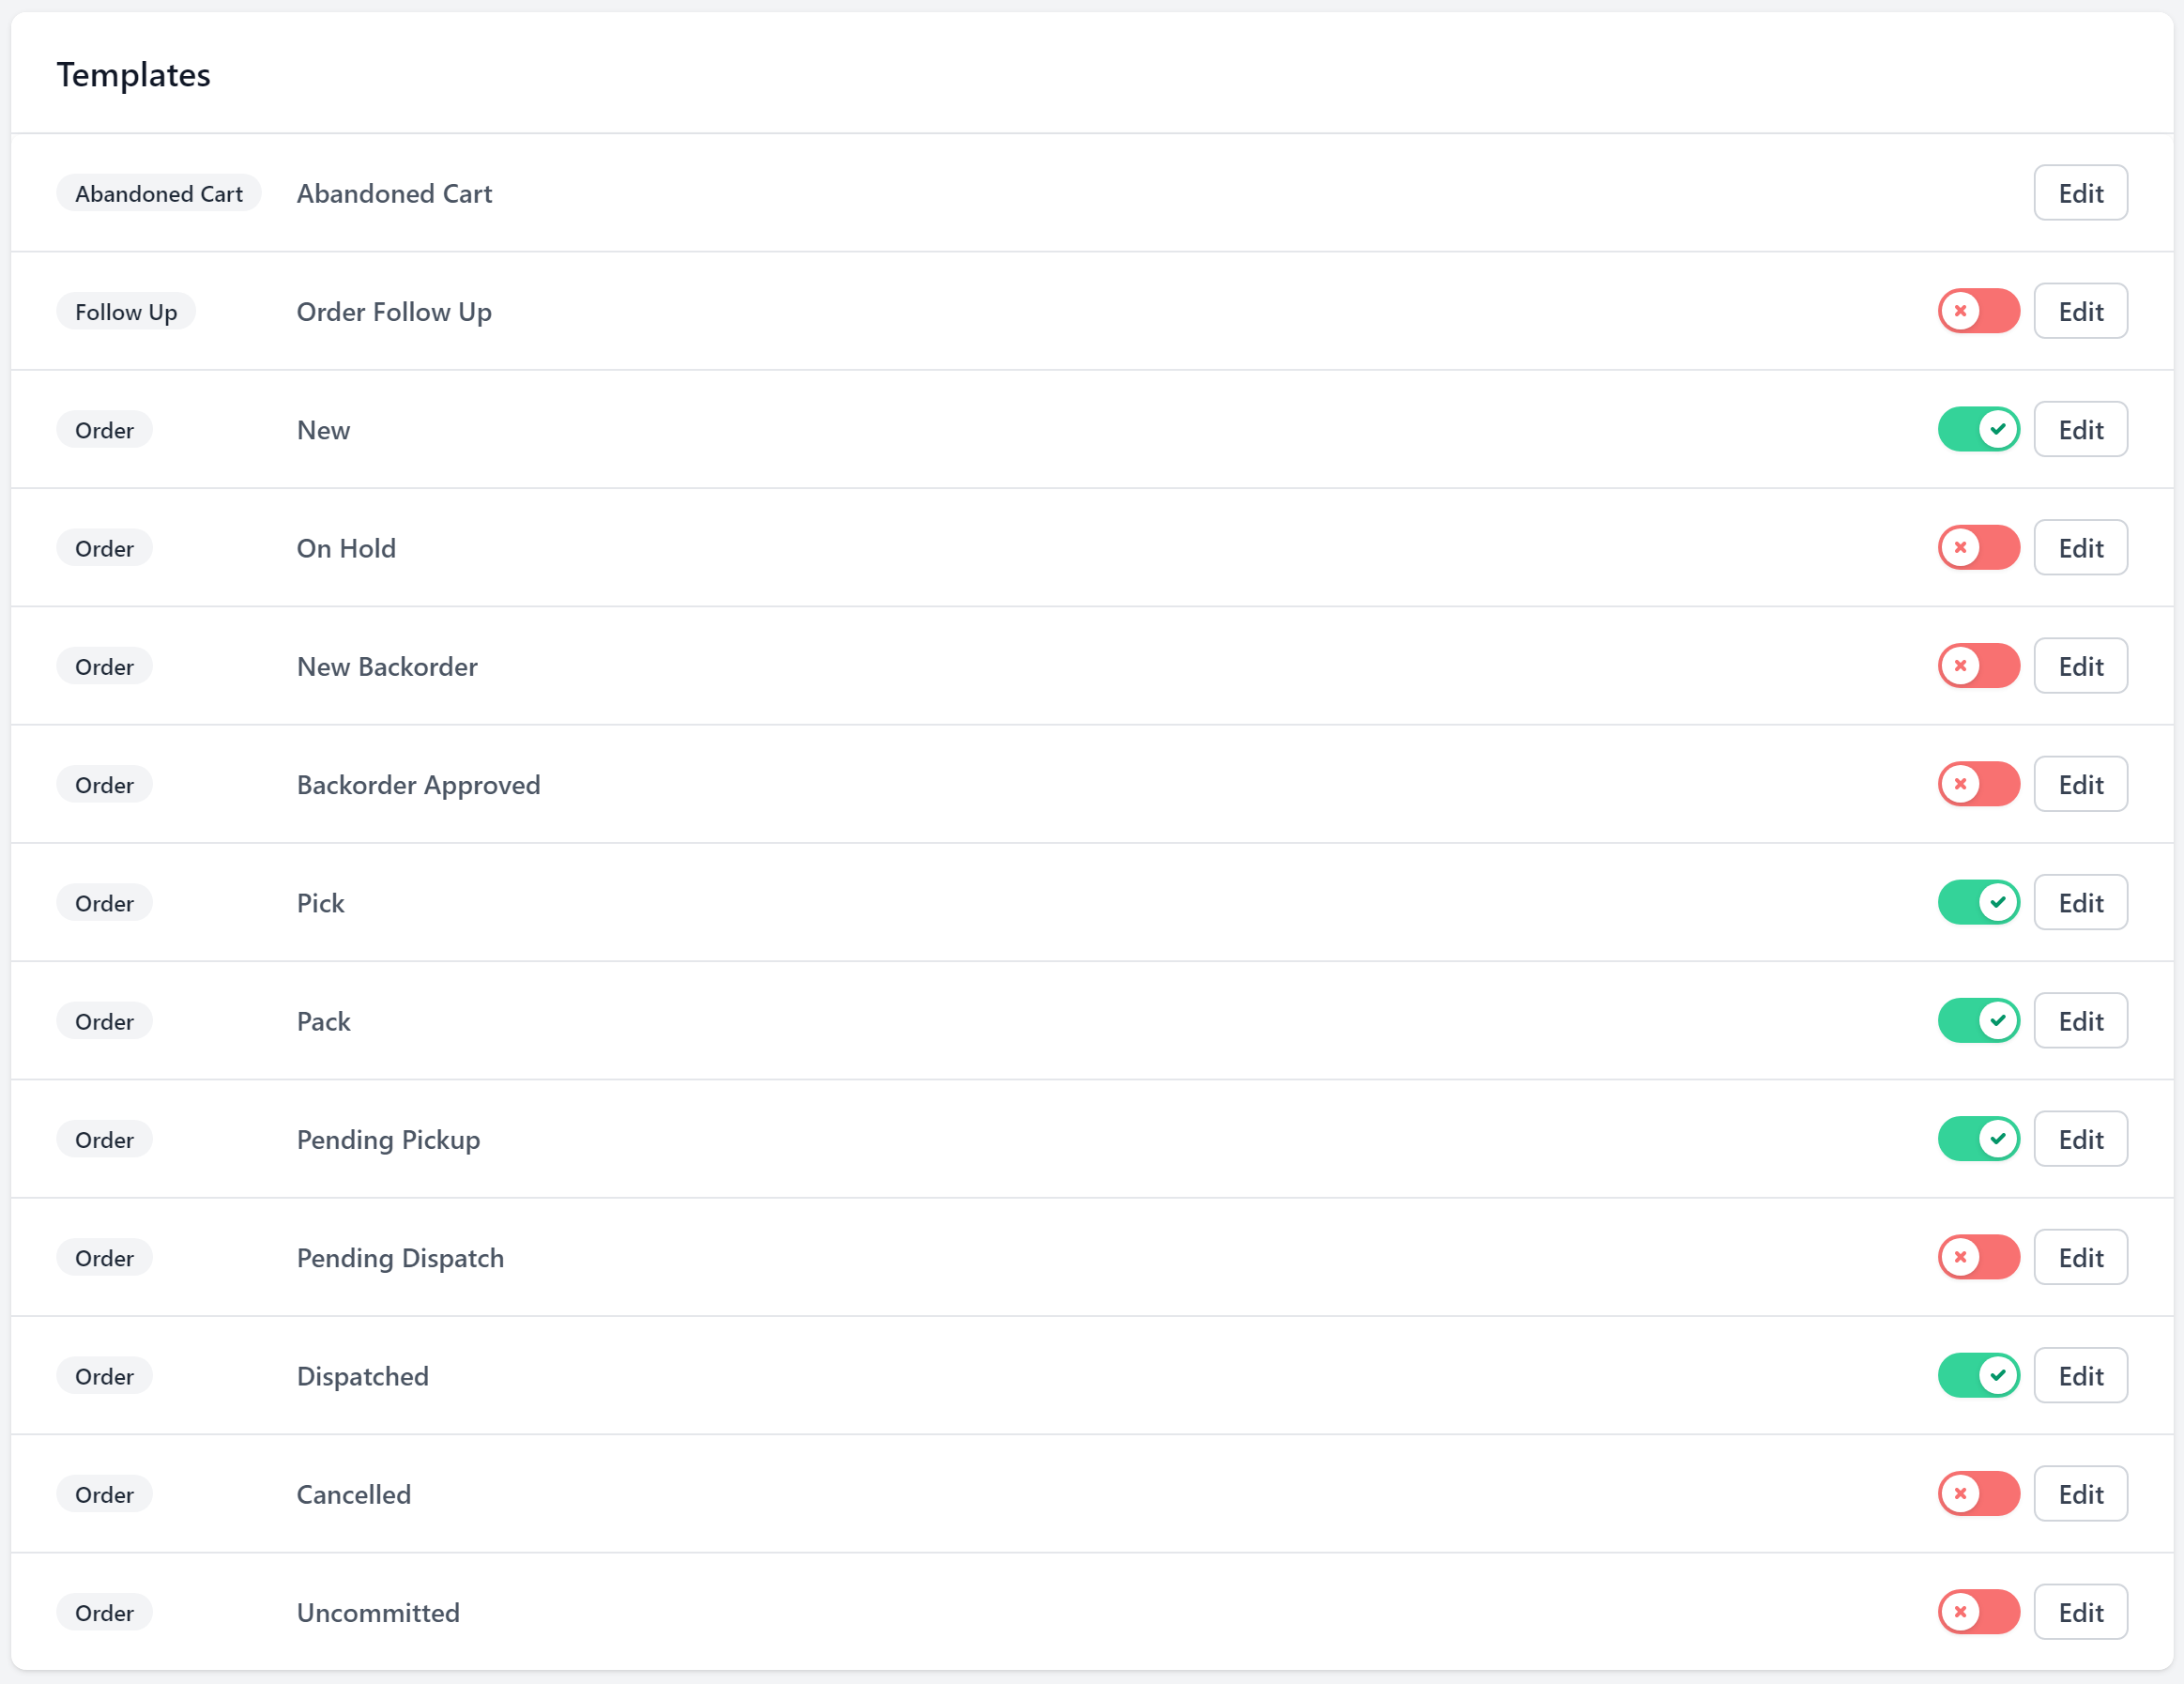
Editing Your Message Templates
To view/change the content of the triggered messages, click the EDIT button to reveal the SMS editor.
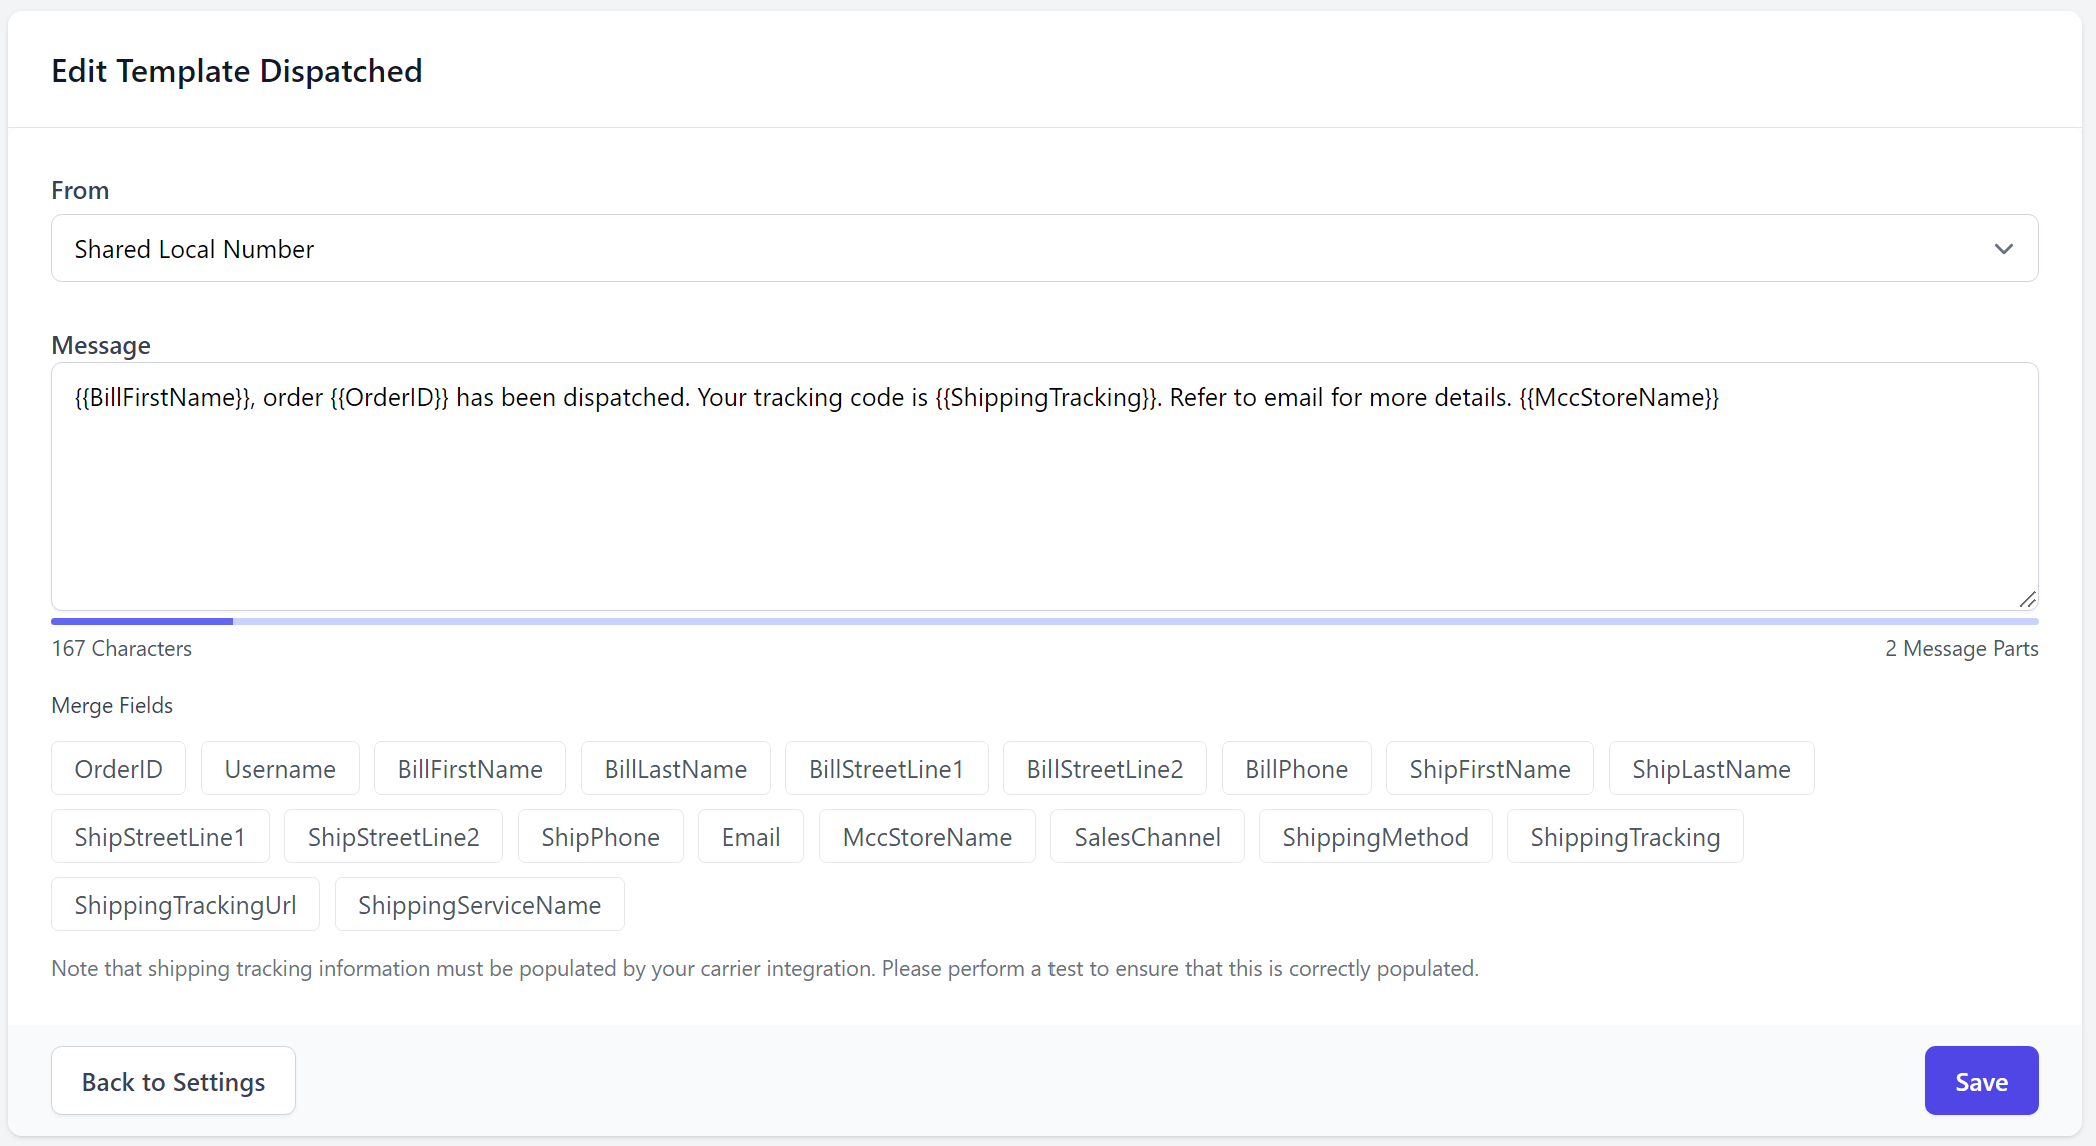
Use the From dropdown to select your Sender ID – this is what your SMS is sent from, the name or number that appears as the sender when your contact receives the SMS. Here are your options:
If you would like your recipients to reply to your SMS
Shared Local Number – Allows recipients to reply
This shared pool of mobile numbers allows you to receive replies to SMS sent. Numbers are randomly selected, so recipients receive messages from a different number each time you send. This is free to use and receive replies.
A Virtual Number – Allows recipients to reply
You can purchase a Virtual Number from your touchSMS account (pricing and availability vary per region). Along with sending SMS and capturing replies, your recipients can text in to your number anytime.
Alphanumeric Sender ID – No Replies
Replace the sender number with a word like ALERT, URGENT or send from your brand name, by setting up an Alphanumeric Sender ID (availability varies per region). Recipients CANNOT reply to messages sent using an alphanumeric Sender ID.
To add a Sender ID to this list, in touchSMS click on Settings > Allowed Senders IDs.
Verified Mobile Number – Replies to Your Mobile
You can send SMS from touchSMS using your registered verified mobile number. Replies to these messages will be delivered to your mobile – not received in your touchSMS account.
Message
Each order status is pre-populated with a default SMS template. Edit your template to include customer and order information or links to your store. Each character is counted to ensure you know exactly how many message parts you are sending.
Merge Fields
Use the provided merge fields to add specific customer and order information to your message. Simply click on a merge field button to add it to the message. Keep an eye on your message length when adding merge fields – when the information is populated, this could increase the length of the message sent.
Once you have made your changes, click SAVE to confirm.
Excluding Orders from Automatic Order Status Messages
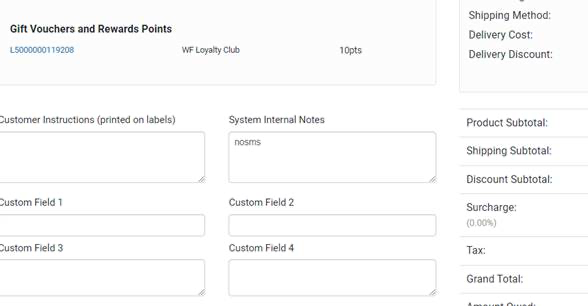
In order to allow certain orders to be excluded from automatic order status notifications, add “nosms” anywhere in internal notes field.
Automatic Order Follow Up SMS
Select an order status to trigger a follow up message after a determined amount of time. This is perfect for collecting feedback and product reviews to ensure customer satisfaction.
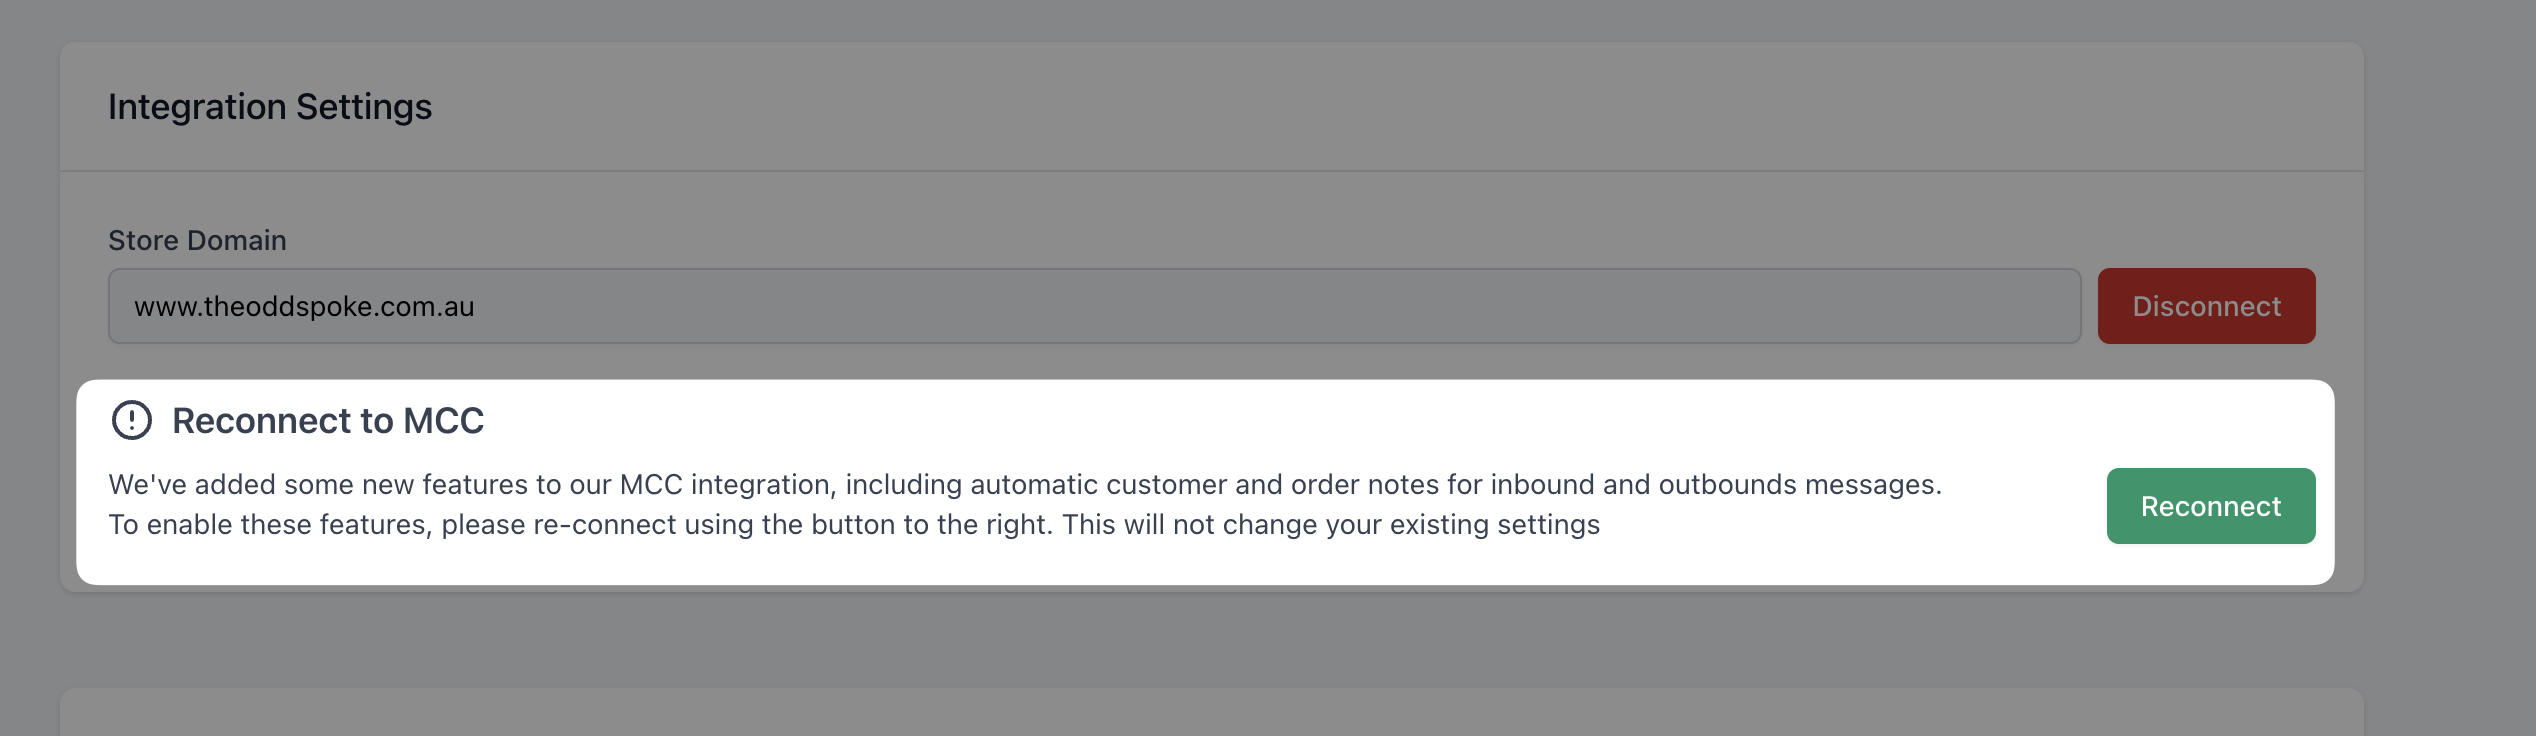
MCC Chrome Extension
touchSMS provides Chrome users with enhanced sending features directly from Maropost Commerce Cloud. Enabling the Chrome Extension will allow you to send SMS directly from orders and have a log of messages sent and received (replies) added as sticky notes to these.
NOTE: Existing MCC integration customers must reconnect their app to use this feature.
Simply login to touchSMS and navigate to INTEGRATIONS > MAROPOST > CONFIGURE. You will see the below notification under your store domain:
Setting up the Chrome Extention
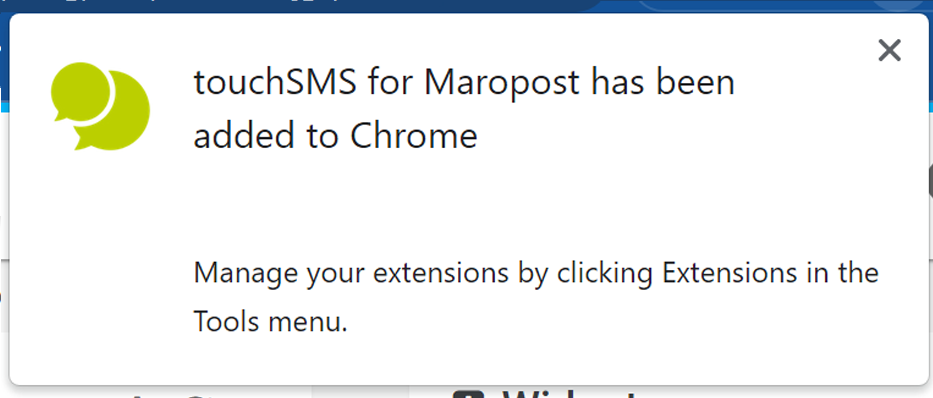
Click “Add to Chrome” to start the installation.

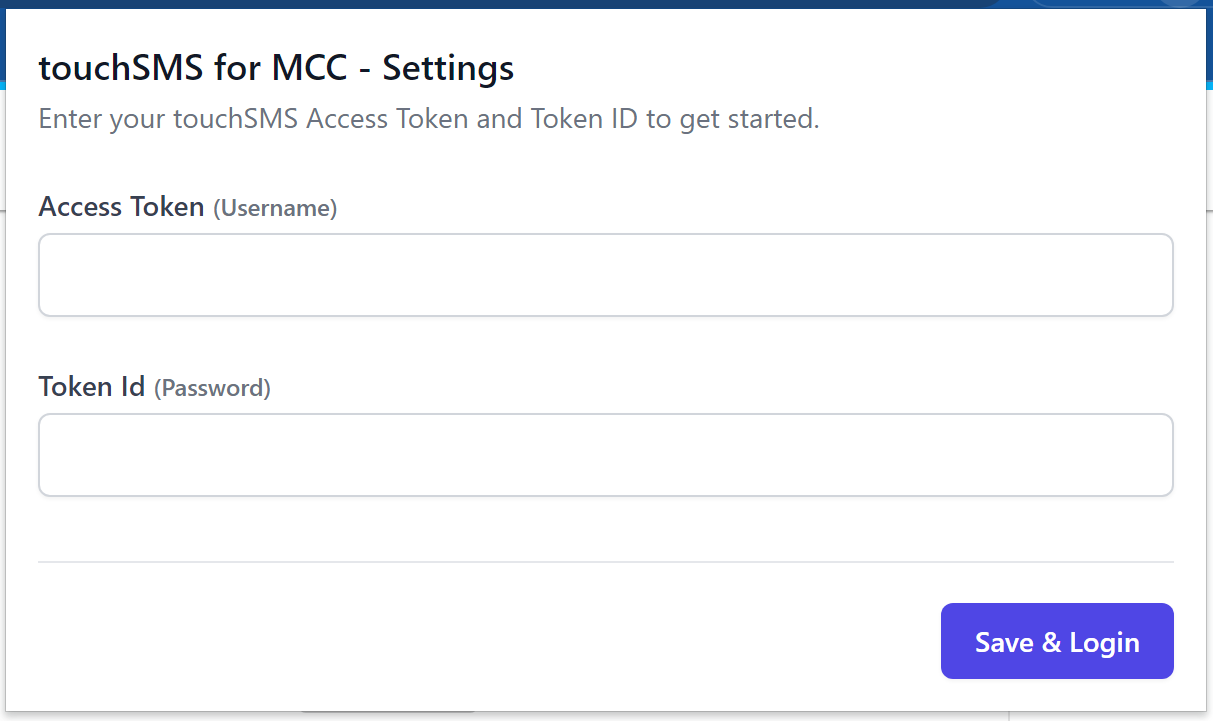
NOTE: You will need the Access Token and Token ID details visible here to complete the Chrome Extention setup.
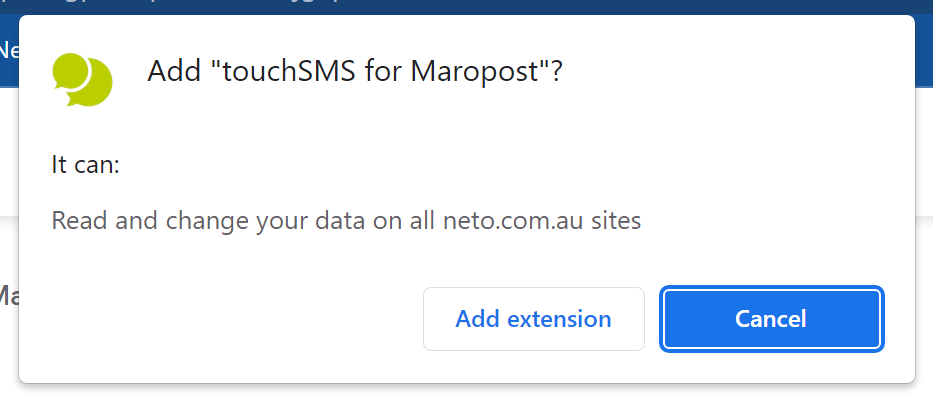
You will then be directed to the Google Chrome Web Store listing for the touchSMS for Maropost extension. Click Add to Chrome.

A pop-up will appear to notify you that this extension will “Read and change your data on all neto.com.au sites”. This notification informs you that once installed, our Chrome Extension will be able to log your messages in order and customer notes. Click Add Extension to proceed.
Once the Extension is added, you’ll need to connect this to your touchSMS account.
On your Chrome top bar, look for the puzzle piece icon – click here to display your installed Chrome Extensions and select touchSMS for Maropost.

The extension will then ask you to enter your touchSMS Access Token and Token ID (these are visible on your Maropost Settings page in touchSMS). Copy and paste your details and click SAVE & LOGIN.
The following confirmation screen will then display your account email address – be sure NOT to click logout!

Installation is now complete.
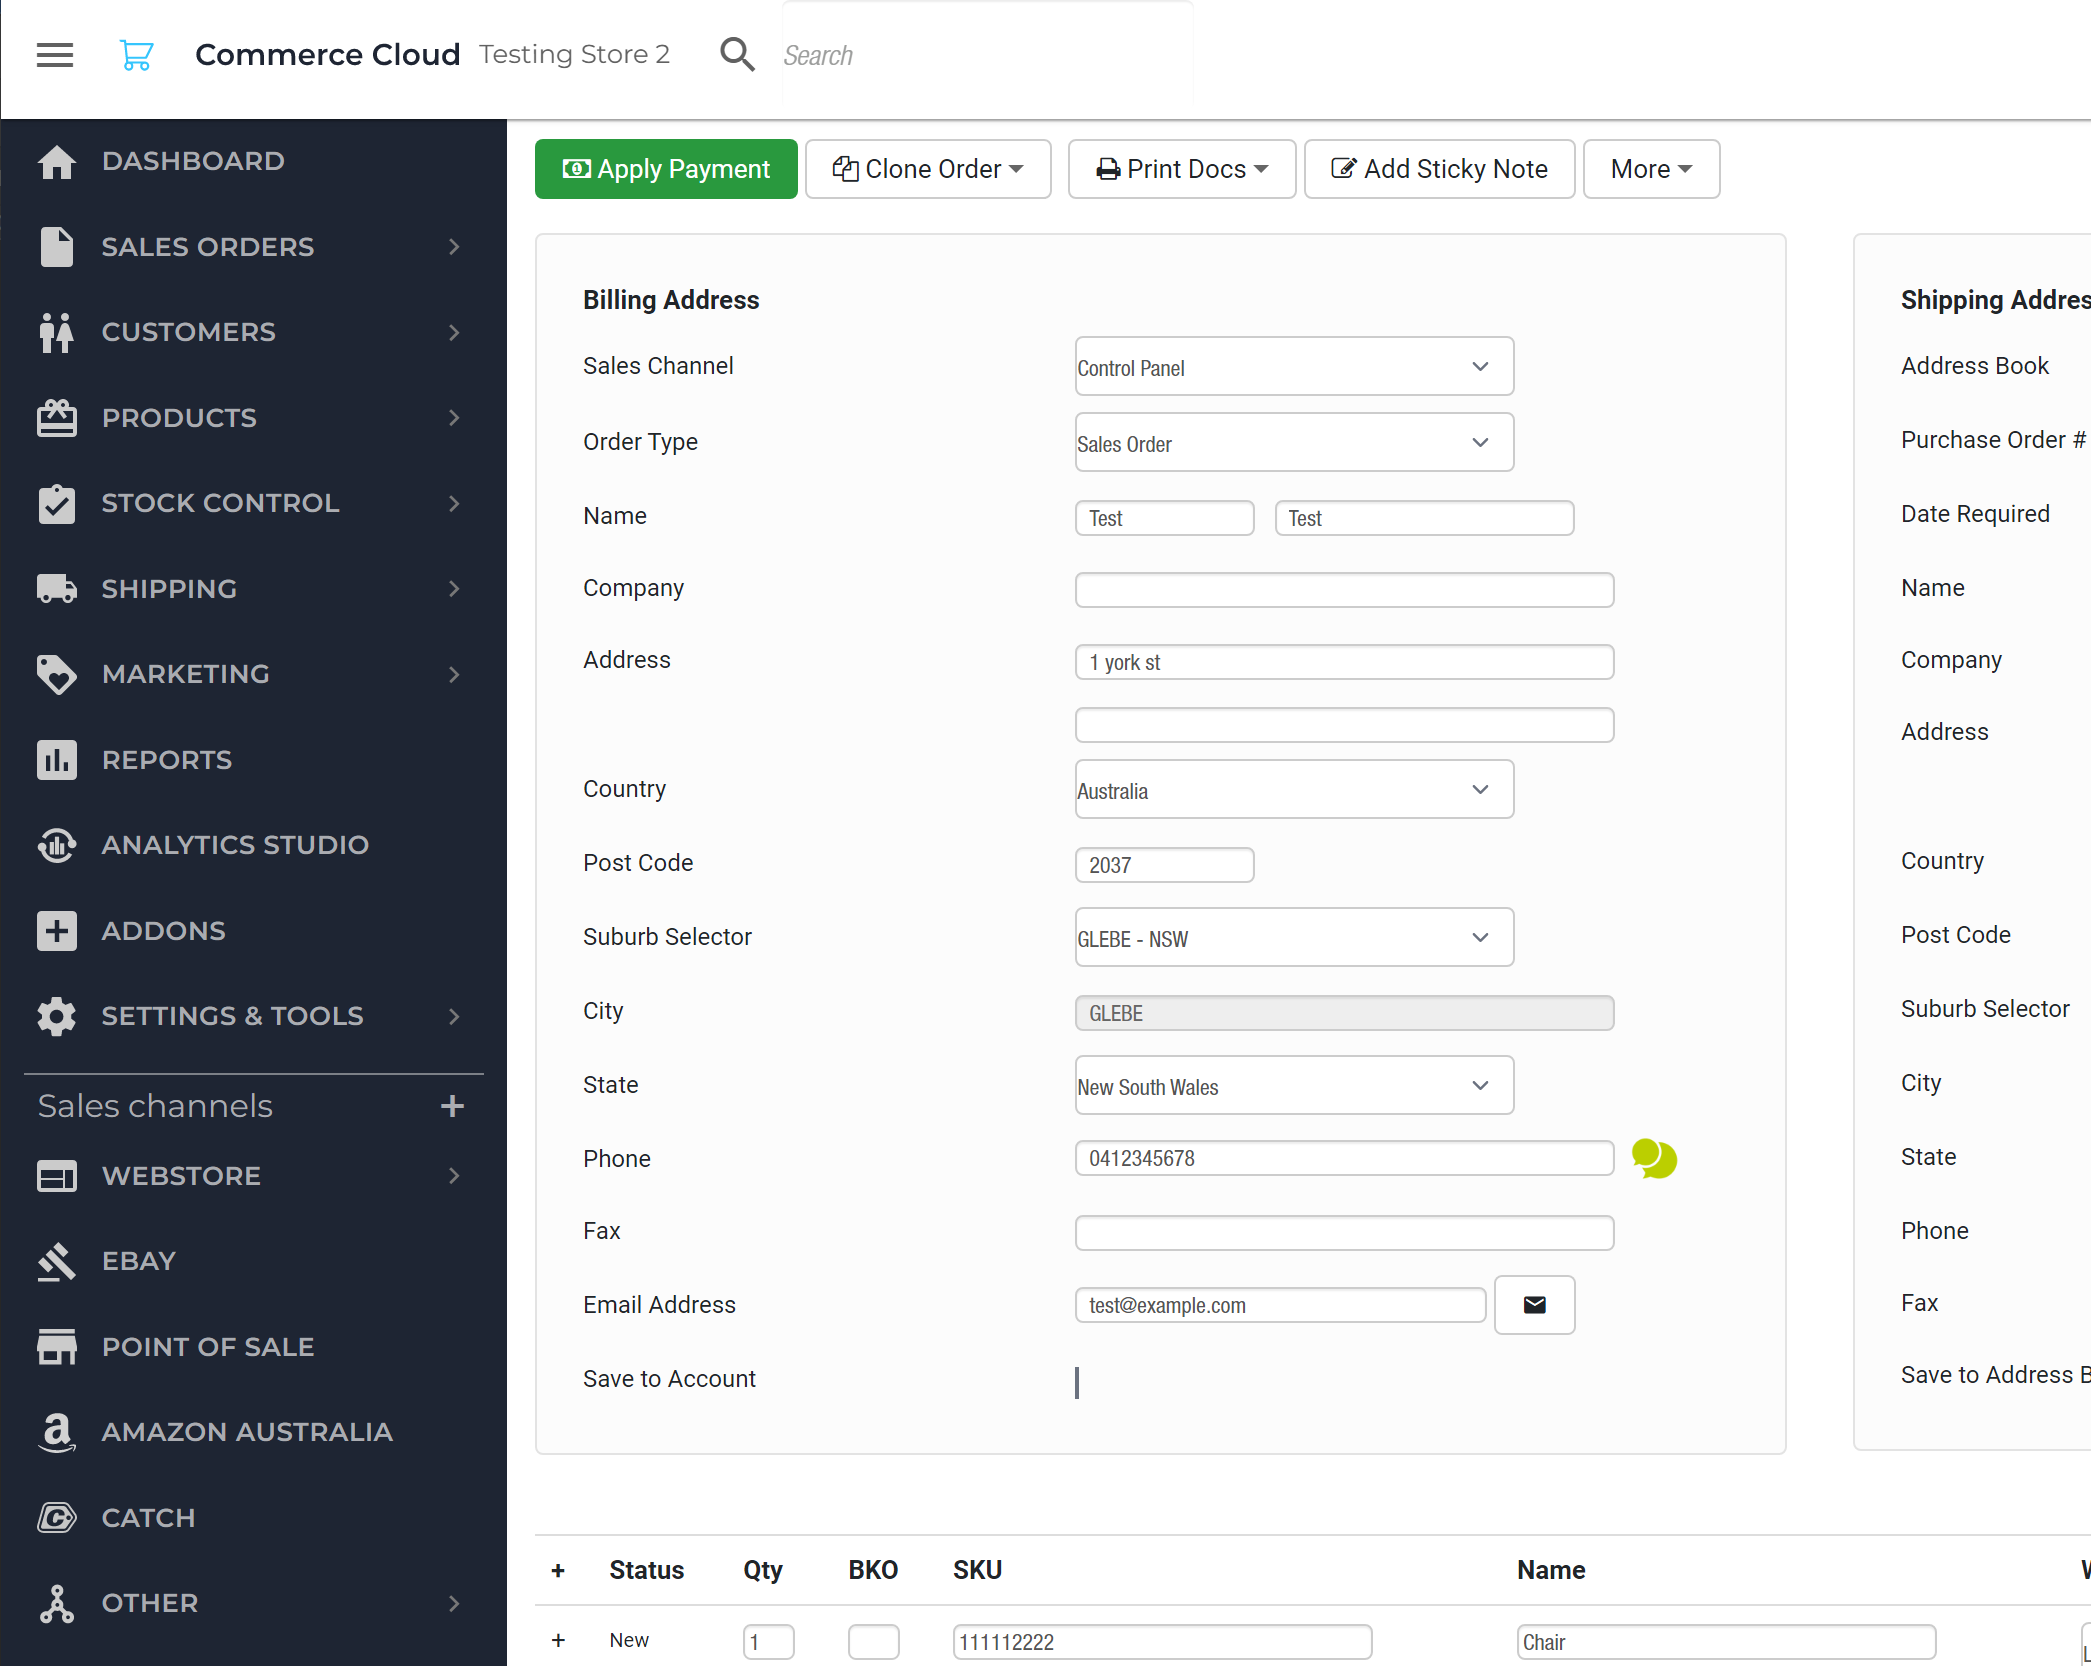
Sending Directly from Orders in MCC
The touchSMS icon will now display next to mobile numbers on your Maropost orders, allowing you to send SMS directly to customers from here.
Click the touchSMS icon to open SMS sending window.
The SMS sending screen will automatically populate the recipient’s number from the order however, you can add more recipients manually or select from the contacts saved to your touchSMS account here too.
Use the From dropdown to select your sending method (more info), then compose your messages in the content area – you can select from pre saved templates and insert merge fields with order information. Then click SEND.
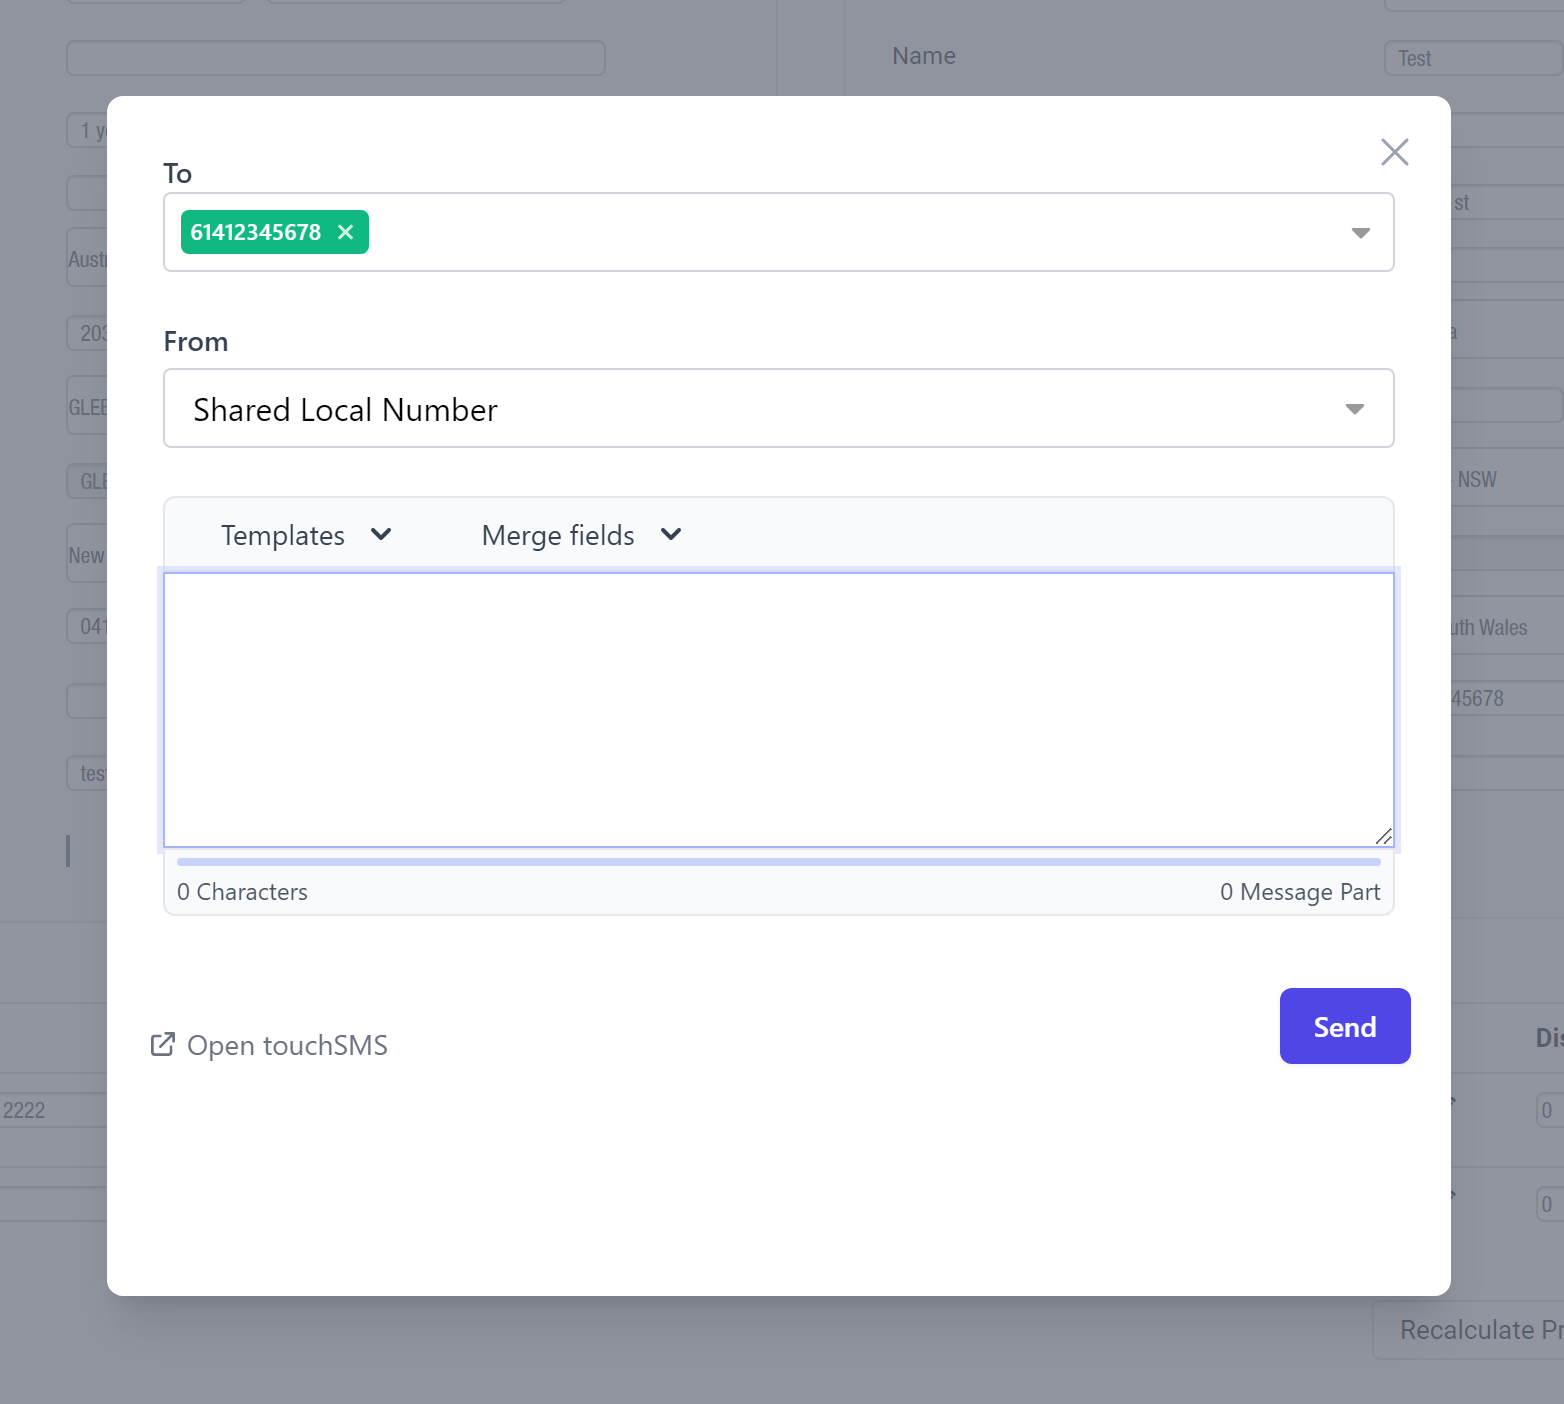
A notification will slide out to confirm your message has been sent to the customer.
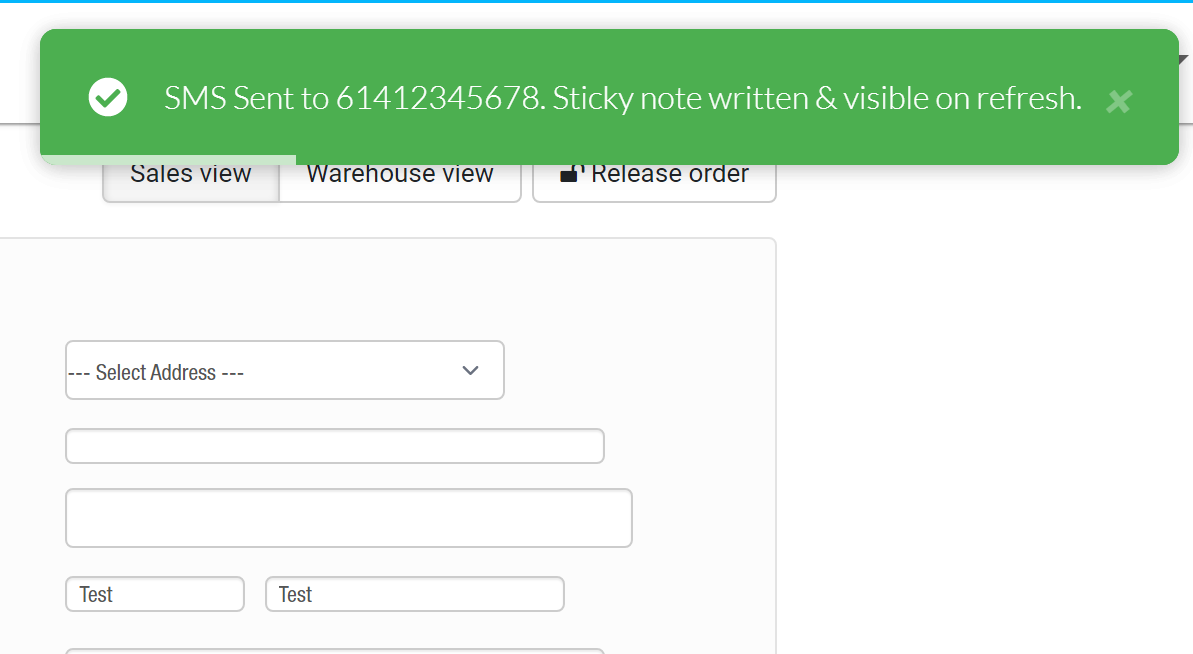
Your message will be logged on this order as a sticky note.